Barony of Faulmoor
The land of Faulmoor is a grim, marshy region of Norvostra, where the air hangs heavy with damp and decay. The ground is soft, treacherous, and constantly shifting beneath your feet, a maze of murky waters and twisted trees. Fog clings to the land like a second skin, never fully lifting.
The Rotmire Blight’s reach is undeniable, and quarantine wards are scattered across the region, cutting off entire towns from the rest of the world. No one dares venture too close to these places, as the blight has claimed many, leaving them to fester in isolation.
- Faulmoor Overview
- House Valkenmar of Faulmoor
- Faulmoor Locations
- Valkenheim
- Vexenford
- Greymire
- Charrow
- Hadran's Rest
- Oldfen
- Ashenmoor
- The Pale
- Crookbend Station
- Lathander Monastery in the Pale
- Blackholt Fort
- The Ash Peaks
- Southvale
- The Harrowgate Ruins
- Ebonmoor Overview
- House Wilthorne of Ebonmoor
- Ebonmoor Locations
- Fenmire Overview
- House Harrowden of Fenmire
- Fenmire Locations
Faulmoor Overview
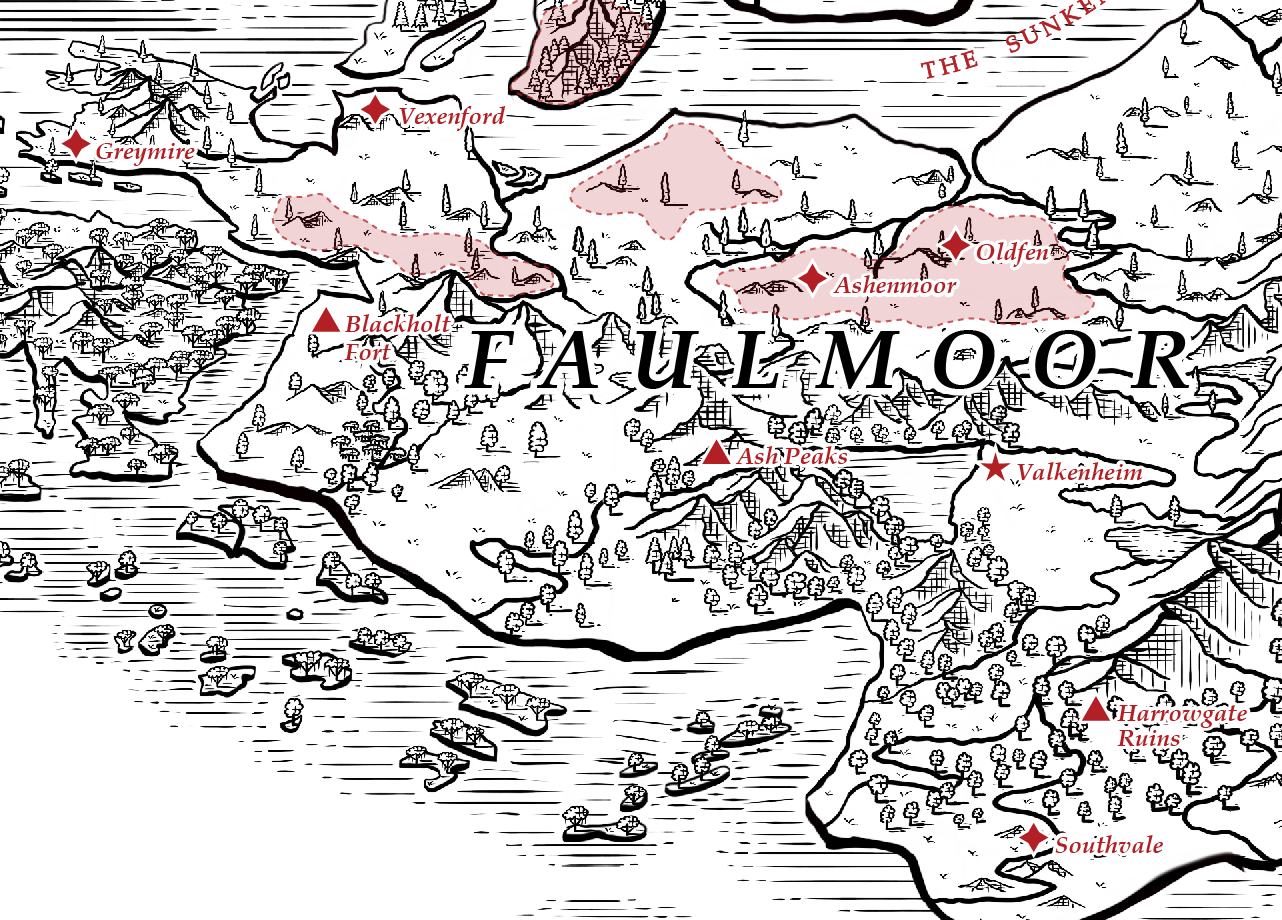
Faulmoor is a low, wet barony of marsh, floodplain, reclaimed farmland, ports, and old trade routes. In the second year of the Rotmire Blight, failing roads and drainage works are allowing water to reclaim abandoned fields and settlements while the region's noble houses struggle to preserve authority, trade, and access to silver.

Overview
Before the Blight, Faulmoor's practical strengths were productive farmland, navigable routes, and its position within regional trade. The discovery of rich silver veins in Fenmire later made the barony even more important.
Its crisis is therefore visible in mundane failures as often as dramatic ones: a road not repaired, a drainage ditch left choked, a ferry route abandoned, or a market opening with half the goods people once expected to find there.
The Blight disrupted the ordinary labor that kept the landscape usable. Roads go unrepaired, drainage fails, fields soften into marsh, and abandoned settlements flood from the ground upward. Routes once regarded as seasonal inconveniences can now become impassable barriers.
Faulmoor remains inhabited and traveled, but survival is uneven. Fortified cities, isolated villages, river stations, smuggling ports, quarantine zones, and ruined settlements may lie only a few days apart. Farmers, ferrymen, soldiers, traders, scavengers, smugglers, and refugees all compete to keep movement possible across a landscape that becomes less dependable every season.
History
Faulmoor was governed through House Valkenmar, with House Wilthorne of Ebonmoor and House Harrowden of Fenmire serving as powerful vassal houses.
That arrangement depended on military protection, trade, and access to resources moving between the three regions. The Blight placed all three under pressures that reward isolation and self-preservation, weakening relationships that were already unequal.
The first year of the crisis produced several containment disasters that hardened later policy across the barony and left entire stretches of countryside abandoned.
Present Day
House Valkenmar retains baronial authority from Valkenheim, but its forces and administrative reach are stretched thin. This is particularly visible in places such as Greymire, where formal authority still exists but practical control depends heavily on local operators and negotiated tolerance.
Ebonmoor remains strategically important for trade and controlled access. Fenmire's silver gives House Harrowden leverage far beyond the political weight the marsh region once held.
Across the barony, quarantine policy, scarcity, smuggling, private violence, religious revival, and local improvisation increasingly shape daily life. Faulmoor is not uniformly ruined. Some settlements continue to function, but the distance between a working market and an abandoned road can be very small.
Notable Locations
Valkenheim
Valkenheim is the seat of House Valkenmar and the traditional political center of Faulmoor. Its fortifications and administrative importance have only grown as the surrounding region has become less reliable.
Vexenford
Vexenford controls the mainland approach toward Ebonmoor and the major crossing leading toward the island. Its layered construction, checkpoints, and strategic position make it one of Faulmoor's most important controlled gateways.
Greymire
Greymire is a coastal trade and smuggling hub where legitimate commerce, contraband, information brokerage, refugee movement, and relic traffic overlap.
Oldfen and Ashenmoor
Oldfen is a ruined quarantine settlement whose failed containment wall became one of the defining disasters of the Blight's first year. Nearby Ashenmoor fell rapidly after Blighted from Oldfen reached its unfinished defenses.
The Pale and Blackholt Fort
The Pale is one of Faulmoor's best-known quarantine regions, a broad drowned landscape where abandoned infrastructure and prolonged Blight exposure have reshaped the countryside. Blackholt Fort, farther south, remains Faulmoor's largest major fortress and an important military landmark.
The Ash Peaks
The Ash Peaks rise near Valkenheim and remain one of Faulmoor's least controlled regions, known for difficult passes, abandoned workings, and persistent relic legends.
Southvale
Southvale was once known for fertile countryside and river access. The arrival of wealthy refugees during the Blight transformed its social order and intensified conflict over food, property, and local power.
The Harrowgate Ruins
The Harrowgate Ruins are a partially submerged ancient site southeast of Valkenheim, visited by pilgrims, scholars, and relic-seekers despite their reputation for strange phenomena.
Major Regions
Ebonmoor
Ebonmoor is an island domain ruled by House Wilthorne. Its trade routes, bridge access, and relative isolation give it unusual leverage within the barony.
Fenmire
Fenmire is a difficult marsh region ruled by House Harrowden. Its silver deposits, waterways, and isolation have become central to Faulmoor's survival economy.
See Also
House Valkenmar of Faulmoor
“Steel and Sacrifice.”
— House Valkenmar motto
House Valkenmar is the ruling house of Faulmoor, seated at Valkenheim. Its authority rests on military power, old political legitimacy, and a tradition of severe public duty that has become increasingly literal during the Rotmire Blight.
Overview
Before the Blight, House Valkenmar stood among the strongest powers in the region. Valkenheim's fortifications, trade connections, and administrative importance supported a baronial system in which House Wilthorne of Ebonmoor and House Harrowden of Fenmire served as major vassal houses.
For ordinary people, that authority arrives as gates, soldiers, paperwork, quarantine orders, guarded supplies, and the question of whether the barony still has enough reach to enforce the next command it gives.
The Blight has weakened the practical reach of that system. Quarantines, ruined roads, lost settlements, military commitments, and scarcity have forced Valkenmar resources across a widening set of emergencies.
The house remains the legal center of Faulmoor's government, but its ability to enforce that authority varies sharply from place to place.
History
House Valkenmar's power grew around Valkenheim and the trade routes that connected the barony's agricultural lands, ports, military posts, Ebonmoor, and Fenmire.
Its relationship with House Wilthorne was historically close and mutually useful, while its relationship with House Harrowden was more openly unequal and pragmatic. The Blight has strained both arrangements.
Present Day
Baron Malric Valkenmar remains the head of the house. His government is associated publicly with hard containment measures and the belief that survival may require severe sacrifice.
The house's soldiers and officials continue to operate across Faulmoor, but shortages and competing crises have made direct control inconsistent. In places such as Greymire, Valkenmar authority is recognized even where day-to-day order depends on local power brokers and informal arrangements.
Tension with the vassal houses has increased as Ebonmoor protects its own trade and Fenmire uses its silver supply as political leverage.
Major Members
Baron Malric Valkenmar is the current head of the house and Baron of Faulmoor. Lord Ivor Valkenmar, his younger brother, is a prominent administrator involved in the house's economic affairs. Lady Freya Valkenmar and Lady Astrid Valkenmar are remembered members of the family lost during the Blight era, while Lukas Valkenmar remains the surviving young heir.
See Also
Faulmoor Locations
Faulmoor is a land steeped in sorrow, where the weight of the Rotmire Blight presses against the hearts of its people as surely as the thick fog that clings to its marshes. The air is heavy with decay, carrying the scent of damp earth, stagnant water, and something far fouler—the distant, cloying rot of the dead. In the second year of the Blight, the land is neither fully consumed nor truly untouched, existing in a purgatory of slow decline. The deeper reaches of the swamps pulse with the foul sickness, and abandoned hamlets sag beneath the weight of creeping mold and deathless hunger. But Faulmoor is not yet lost—its roads are still traveled, its villages still cling to life, and its people still fight for whatever scraps remain.
Valkenheim
“Valkenheim is a golden lantern in the dark.”
— Lord Ivor Valkenmar
Valkenheim is the capital of Faulmoor and the seat of House Valkenmar. Its maintained streets, gardens, markets, and fortified walls stand in deliberate contrast to much of the surrounding barony, where the Rotmire Blight has damaged roads, emptied settlements, and disrupted ordinary government.
Overview
Valkenheim remains one of Faulmoor's most tightly controlled cities. House Valkenmar maintains the walls, gates, markets, barracks, canals, and civic spaces with unusual care, preserving a degree of public order that few settlements can still manage.
Its most unsettling quality is that ordinary life still works. Gardens are tended, markets open, canals are maintained, and punishment remains public because the city spends extraordinary effort deciding what and whom it will protect.
That order is selective. Entry is tightly restricted, identification and official purpose matter, and refugees or unapproved travelers may be turned away. Wealth, official standing, valuable trade, or the favor of influential people can make passage easier, while most outsiders face scrutiny before they ever reach the interior streets.
Daily life remains unusually visible inside the walls. Markets open, gardens are maintained, food and medicine are distributed, trades continue, and public spaces are kept usable. The contrast between those routines and the military precautions surrounding them is one of Valkenheim's defining features.
History
Valkenheim grew as Faulmoor's political and administrative center, supported by major trade routes and the military power of House Valkenmar. Its fortifications once demonstrated wealth and authority as much as practical defense.
The Blight changed the purpose of those defenses. As nearby settlements failed or were quarantined, Valkenheim's walls became barriers against uncontrolled movement as well as attack. Gates grew more selective, patrols increased, and access to the city became a privilege rather than an ordinary part of regional travel.
Present Day
Baron Malric Valkenmar rules from the Blackspire, while his brother Lord Ivor Valkenmar is publicly associated with much of the city's daily administration and the effort to preserve ordinary civic life.
Military patrols, controlled access, and quarantine policy are part of everyday life. Markets and institutions continue to function, but that stability depends on guarded supply lines, constant maintenance, and decisions about who is allowed to benefit from the city's protection.
Smuggling and bribery are widely rumored despite the city's reputation for strict control. The Duskwater Canal and stories of hidden routes feature prominently in such accounts, although the reliability of any particular route changes quickly.
Notable Locations
The Blackspire
The Blackspire is the seat of House Valkenmar and the dominant fortress within Valkenheim. Its blackened towers and heavy fortifications make it the city's most visible symbol of baronial authority.
The Gilded Exchange
The Gilded Exchange is one of Valkenheim's principal controlled markets. Food, medicine, silver, and other scarce goods pass through it under close supervision while ordinary merchants continue to serve residents who can afford what remains available.
The Silverclad Spire
The Silverclad Spire is a major religious and scholarly institution. Worship continues there, while restricted chambers, unusual traffic, and the presence of healers and scholars have fueled persistent rumors about Blight research. The extent of that work is not publicly established.
Duskwater Canal
The Duskwater Canal was once a major commercial waterway through the city. It remains useful for movement and supply, but Blight-era quarantine practices and the disposal of bodies have given its dark waters a grim reputation.
The Sunveil Gardens
The Sunveil Gardens are among Valkenheim's best-maintained public spaces. Their continued care provides residents with one of the clearest signs that the city still has the labor and resources to preserve something beyond bare survival.
The Ironveil Barracks
The Ironveil Barracks house many of the troops and enforcers responsible for maintaining order and guarding Valkenheim's approaches.
The Widow's Walk
The Widow's Walk overlooks the Duskwater Canal and is associated with public executions. Its use reinforces the same message as the city's walls and gates: safety inside Valkenheim depends on obedience to rules enforced without much room for appeal.
See Also
Vexenford
“I came here hoping for safety, but all I found was more death.”
— an unnamed refugee
Vexenford is a massive fortified harbor-city in Faulmoor controlling the mainland approach to Ebonmoor. Governed under House Valkenmar, it is both an active trade center and one of the barony's most important checkpoints during the Rotmire Blight.
Overview
Stone walls, scarred ramparts, watchtowers, docks, and fortified bridgeworks dominate Vexenford. Merchant vessels, fishing craft, freight traffic, and armed house ships still use the harbor, keeping the city economically important despite strict control over movement.
The city's class divide can be read vertically. Wealth lives in cleaner air above the street, while labor, runoff, crowding, checkpoints, and much of the cost of keeping the city alive collect below.
Vexenford's defining modern feature is vertical. During the Blight, wealthy residents began building bridges and platforms above the crowded original streets. Those structures expanded into stairs, alleys, shops, homes, and whole elevated blocks, creating a second city above the first.
The upper level is cleaner, drier, brighter, and better maintained, with treated timber, stonework, painted facades, wrought iron, glass, better food, and private towers. Below, the original streets sit beneath beams, awnings, and the undersides of newer construction. Ash, runoff, refuse, and reduced sunlight make the city's class divide physically unavoidable.
History
Before the Blight, Vexenford was already a major harbor and trade center positioned where traffic from mainland Faulmoor could move toward Ebonmoor.
As quarantine and restricted movement became central to regional survival, the crossing grew even more important. Fortifications, inspections, and military control expanded while displaced wealth reshaped the city upward. What began as elevated bridges and private platforms became a permanent upper district.
Present Day
Vexenford remains busy because it still connects people and goods that cannot easily travel elsewhere. The same importance makes it heavily policed.
Travelers approaching Ebonmoor are inspected, cargo is scrutinized, and suspected exposure can result in confinement or refusal of passage. Refugees and displaced people gather around a system built to keep movement selective, while forged papers, bribery, and smuggling remain persistent responses to those restrictions.
The upper and lower city now function almost as different social worlds, although each depends on the labor, trade, infrastructure, and movement of the other.
Notable Locations
The Iron Gate
The Iron Gate controls the principal lawful crossing toward Ebonmoor, where the route meets Rimewatch Keep on the island side. Soldiers inspect travelers, papers, cargo, and visible signs of possible Blight exposure before allowing passage.
The Blackflow Docks
The Blackflow Docks remain active under military scrutiny and are central to Vexenford's continuing trade. Approved cargo, fishing traffic, house vessels, and less lawful business all compete around the same waterfront.
The Rot Ward
The Rot Ward is a walled quarantine district used to confine people suspected of Blight exposure. Its reputation is grim, and stories of wrongful confinement, abuse, and people disappearing behind its barricades circulate widely. Officials describe the ward as a containment necessity.
The Upper City
The elevated districts contain wealthier homes, shops, private towers, covered walks, and bridges built above the older street plan. Construction ranges from elegant stone-and-timber residences to precarious additions suspended over lower streets.
The Lower City
The original city remains crowded beneath the newer construction. It receives less light, more runoff, and much of the physical burden created by life above. Markets, workshops, lodging, labor, and ordinary street commerce continue there despite harsher conditions.
Blackflow Market
Blackflow Market remains a major commercial district. Legitimate trade mixes with medicine, stolen goods, forged papers, contraband, and other transactions that thrive under restrictive movement laws.
The Hollow Crown
The Hollow Crown is a worn tavern on the city's outskirts frequented by mercenaries, travelers, refugees, smugglers, and people looking for work or passage. Its reputation rests more on connections than comfort.
Gallows Square
Gallows Square is used for public punishment and execution. Bodies may remain on display as warnings, making the square one of the clearest expressions of House Valkenmar's visible enforcement in the city.
See Also
Greymire
“In Greymire, you can buy anything: stolen grain, a name that ain't yours, a dagger meant for a friend's back.”
Greymire is a coastal city in Faulmoor and one of the region's most active surviving ports. It remains formally subject to House Valkenmar, but the barony's military and administrative resources are too thin to closely police every dock, neighborhood, hidden landing, and informal trade network.
Fishing, legitimate commerce, smuggling, refugee transport, and illicit trade therefore exist beside one another. Greymire is not politically independent or truly lawless. It survives in the space between formal authority and limited enforcement.
Overview
Greymire is wet, crowded, and densely built. Salt-stained warehouses, leaning timber buildings, cracked cobbles, working quays, patched roofs, improvised barricades, and hastily repaired vessels give the city a visibly worn character. Salt, fish, mold, smoke, wet rope, cooking food, and harbor water mingle from street to street.
A Greymire morning can contain all of those worlds at once: fish coming off boats, a roof being patched, freight changing hands, a refugee bargaining for a room, and officials collecting the dues of a government that cannot fully control the next street.
The city remains busy because goods, people, information, and contraband still need somewhere to move when official routes fail. Fish are unloaded at dawn, freight changes hands, ships are repaired, contracts are negotiated, rooms are rented, and market stalls continue to serve ordinary households alongside smugglers and refugees.
Bright scraps of cloth, knotted cord, painted marks, and similar signs are used in parts of the city as warnings, route markers, business signals, or coded communication. Their meaning depends heavily on neighborhood and audience.
History
Before the Rotmire Blight, Greymire was a prosperous shipping city supported by fishing, warehousing, maritime trade, and the traffic of travelers and goods through Faulmoor.
The Blight disrupted roads, emptied settlements from established trade routes, and made movement between communities increasingly dangerous. Greymire's economy changed rather than collapsed. Unofficial networks expanded into the gaps left by failing institutions, and activities once regarded as straightforward smuggling became entwined with the movement of food, medicine, people, silver, and information.
Containment failures during the early Blight permanently reshaped how people enter and leave the city.
One of the city's deepest scars is Charrow, a cluster of wards deliberately burned during the early crisis without meaningful evacuation. Greymire later rebuilt around the ruined district rather than removing it.
Present Day
House Valkenmar remains Greymire's lawful ruling authority. Soldiers, officials, clerks, tax collectors, and civic personnel are still present, but practical control varies sharply by district and circumstance.
That produces an uneven civic order. Official checkpoints, fines, custody, records, and public punishments exist beside private brokers, smugglers, freight interests, and neighborhood power figures. Local operators generally understand that tolerance for informal power ends when it draws sustained attention from one of Faulmoor's ruling houses.
Greymire's justice is intentionally visible. People condemned to death may be hanged from the exterior walls and left on display as warnings to those approaching the city. Who is displayed, where, and under what explanation can carry political meaning beyond the punishment itself.
Notable Locations
The Working Docks
Greymire's docks remain the center of its maritime economy. Fishing boats, merchant vessels, patched coastal craft, ferries, freight crews, warehouses, and private brokers all compete for space along the waterfront. Legal and illegal cargo often pass through the same streets and buildings.
The City Gate
Only one of Greymire's former three principal gates remains in regular use. It is both a practical checkpoint and a reminder of the containment failures that reshaped the city during the early Blight.
Charrow
Charrow is a walled burned district inside Greymire. Once known as the Charred Row, it contains an organized inhabited core under the influence of a power broker known as Rook, while deeper ruins remain less controlled.
The district's principal logistical center is the Rookery, a surviving former merchant exchange used to coordinate supplies, favors, debts, and access.
The Marrow Room
The Marrow Room is a decaying brothel long associated with Greymire operator Jorick Vance. Its importance came as much from the people and business that passed through it as from its stated trade.
The City Walls
Greymire's exterior walls serve both defensive and judicial purposes. Executed prisoners may remain hanging from them for extended periods, making the walls one of the city's most visible expressions of formal authority.
Nearby Sites
Hadran's Rest
Hadran's Rest is an island off Greymire's coast centered on a temple and traditions associated with Saint Hadran. It is closely connected to the city by geography and travel, but is not part of Greymire itself.
Campaign Developments
Jorick Vance
Jorick Vance was later found dead and displayed among the bodies hanging from Greymire's exterior walls. The circumstances surrounding his death are not publicly established.
See Also
Charrow
Charrow is a walled burned district within Greymire, formed from neighborhoods deliberately destroyed during the early Rotmire Blight and later isolated behind stone, scrap metal, blackened timber, and improvised barriers.
Its name evolved from the Charred Row, to Char Row, and eventually Charrow.
Overview
Charrow is ruined but inhabited. Blackened stone, collapsed roofs, warped streets, scorched warehouses, and burned masonry preserve the violence of its creation. Greymire later grew directly against its perimeter, leaving the district embedded within the living city rather than abandoned beyond it.
Some surviving buildings remain connected by crawlspaces, old service passages, drainage routes, and damaged streets. Smugglers have used portions of the district to avoid ordinary inspection, although even experienced operators may prefer longer routes rather than cross the deeper ruins.
History
During the early Blight, Greymire officials selected a cluster of affected wards for a controlled burn. Residents received no meaningful evacuation before entire streets were set alight. The fire was stopped only when it threatened healthier districts.
The burned wards were sealed rather than rebuilt. Over time, Greymire resumed construction around them, turning the old disaster into a permanent district boundary.
Present Day
Charrow is not simply an anarchic ruin. An inhabited core functions under the influence of a power broker known as Rook, whose authority depends on logistics, favors, debts, access, and the systems people rely upon to live inside the district.
People now live inside the remains of an atrocity that the rest of Greymire built around rather than repaired. Ordinary survival, informal government, and civic memory therefore occupy the same blackened streets.
That order weakens farther into the burned interior. Charrow therefore contains several overlapping realities: an outer perimeter pressed against modern Greymire, an organized inhabited core, and deeper ruins where the original destruction remains dominant.
Rook's influence is practical rather than civic. Charrow still lies within Greymire, and the district's informal order does not make it independent of House Valkenmar or the city's formal authorities.
Notable Locations
The Rookery
The Rookery is a surviving former merchant exchange or guildhall adapted into a three-story administrative and logistics center. It serves as the principal hub for Rook's network of supplies, favors, debts, and information.
Wild rooks nest around the building, and Rook keeps a tame or semi-tame bird named Ink.
The Burned Interior
Beyond the more organized portions of Charrow, whole streets remain damaged or partially collapsed. Old service passages, drainage infrastructure, fused masonry, and fire-blackened shells make these areas difficult to navigate and harder to control.
See Also
Hadran's Rest
“Let no hand wake him before mercy has finished its work.”
— traditional warning associated with Hadran's resting place
Hadran's Rest is a small sacred island off the coast of Greymire, centered on a temple and resting chamber associated with Saint Hadran, an Ilmatari holy warrior remembered for enduring suffering in defense of others.
The Holy Sleep
The oldest surviving temple tradition does not describe Hadran as simply buried beneath the island. It says that he entered the Holy Sleep beneath the Bound One's mercy and warns that no hand should wake him before mercy has finished its work.
Later generations increasingly treated the chamber as a tomb and the preserved body within it as the remains of a dead saint. Some worshipers still take the older language literally, while others regard the Holy Sleep as devotional metaphor. No single public interpretation has settled the question.
Saint Hadran
Hadran's sainthood rests on endurance rather than conquest. Ilmatari stories remember him repeatedly placing himself between danger and other people, accepting wounds and hardship as part of his service.
The island's identity is built less on triumph than on the belief that suffering accepted for another person can itself be sacred. That idea shapes how Hadran is remembered more strongly than any account of enemies defeated.
That tradition made the island a place associated with mercy, protection, sacrifice, and chosen suffering. The surviving temple presents Hadran as someone who bore a burden because another person should not have had to.
Notable Locations
The Temple of Saint Hadran
The temple is the island's principal sacred structure. Its teachings preserve the older Holy Sleep tradition and the Ilmatari ideals attached to Hadran's memory.
Hadran's Resting Chamber
Beneath the temple lies the chamber containing the preserved body traditionally identified as Saint Hadran. The warning against waking him is associated specifically with this place.
Hadran's Burden
The breastplate associated with Hadran is known as Hadran's Burden. Its name reflects the same religious ideal as the saint himself: accepting danger intended for someone else.
Stories claim that the armor protected Hadran from otherwise fatal blows and helped him draw violence away from those he defended. Such accounts are religious tradition rather than precise public knowledge of the armor's properties.
See Also
Oldfen
“These walls are not built in cruelty, but in necessity.”
— Baron Malric Valkenmar
Oldfen is a ruined settlement in Faulmoor remembered as one of the most notorious containment failures of the Rotmire Blight. During the first year of the crisis, a perimeter wall was built around the town to keep the afflicted population inside. The town was effectively sealed and abandoned to its fate.
Overview
Sections of Oldfen's quarantine wall still stand. The remaining timber is warped and decayed, marked by damage from people who attempted to escape and by the later breach that allowed Blighted dead to spread into the surrounding countryside.
The wall made the town's social contract brutally simple: safety for everyone outside depended on denying escape to everyone inside.
The settlement within is largely ruined. Streets, homes, storehouses, and older commercial buildings survive in varying states of collapse, while the remains of quarantine works continue to define the landscape.
Old burial pits and disposal grounds lie around the perimeter, further marking the area as a place shaped by containment rather than rescue.
History
Oldfen was enclosed during the first year of the Blight as Faulmoor's authorities attempted to prevent the crisis from spreading beyond the town.
Soldiers were stationed around the perimeter with orders to prevent escape. The sealed population was left inside as conditions deteriorated.
The policy failed. Enough of Oldfen's dead eventually broke through the perimeter to create a major outward movement of Blighted. That breach contributed directly to later disasters in the surrounding region, including the fall of Ashenmoor.
Present Day
Oldfen remains overrun and hazardous. Its surviving structures and cellars attract scavengers despite the risk, particularly because stories persist that valuables, silver, and old household wealth remain hidden beneath the ruins.
The town's greater significance is historical. Oldfen is remembered as proof that quarantine could become an instrument of mass death without ultimately achieving the containment it was meant to provide.
Notable Locations
The Quarantine Wall
The surviving wall sections are the most visible remains of the containment effort. Their construction and later breach define Oldfen's history.
Burial Grounds
Unmarked pits and disposal sites remain around the settlement, created during the period when soldiers and laborers attempted to remove bodies from the quarantine perimeter.
The Ruined Town
The interior contains damaged homes, stores, workshops, cellars, and other remnants of the settlement's pre-Blight life.
See Also
Ashenmoor
“To send men to them is not a rescue. It is an invitation to join them.”
— Baron Malric Valkenmar
Ashenmoor is a ruined settlement in Faulmoor whose unfinished defenses became one of the clearest signs of how quickly a containment plan could fail. The town fell within hours when Blighted reached it, before its barricades and walls could be completed.
Overview
Ashenmoor's most distinctive remains are its incomplete defensive works. Wooden walls, gaps, construction materials, abandoned barriers, and buildings pressed into service as improvised defenses show a settlement that was still preparing when the attack arrived.
Its horror is unfinished work: lumber stacked for walls that never closed, barriers abandoned midway through construction, and streets whose defenders planned for a siege that never gave them time to finish preparing.
The ruins do not represent a town that survived a long siege. They preserve the opposite: preparations interrupted before they could become a functioning defense.
History
Ashenmoor was being fortified during the first year of the Rotmire Blight.
Some Blighted emerged from nearby burial grounds, but the larger disaster came from the breach of Oldfen. The resulting surge reached Ashenmoor before its defenses were finished.
The settlement fell within hours.
Some later stories describe survivors holding the unfinished walls for an extended period. These conflict with the more widely accepted account of the town's rapid fall.
Present Day
Ashenmoor remains abandoned and dangerous. Its unfinished barricades, burned defensive positions, and interrupted construction make the ruins unusually legible: much of what survives can still be understood as the work of people who expected more time than they received.
The town is commonly cited alongside Oldfen when discussing the failures of early Blight containment.
Notable Locations
The Unfinished Wall
Large sections of the town's planned defensive perimeter were never completed. Gaps and abandoned building works remain central to Ashenmoor's appearance.
The Ruined Streets
Buildings near the incomplete defenses were adapted hurriedly into barricades and fighting positions during the final hours of the settlement.
See Also
The Pale
The Pale is a broad quarantine region in Faulmoor, lying southeast of Greymire and north of Blackholt Fort. Once a settled landscape of farmland, cattle routes, river traffic, villages, forts, and religious holdings, it has been largely abandoned since the spread of the Rotmire Blight.
Overview
Long neglect has allowed marsh and floodwater to reclaim much of the region. Roads vanish into standing water, firm ground gives way without warning, and old farms and work sites survive as half-submerged remnants of the communities that once maintained them.
The Pale's devastation is as much the absence of labor as the presence of Blight. Drains go uncleared, landing stages rot, roads drown, and routes disappear because too few people remain to maintain the systems that once made the landscape habitable.
Travel remains possible, but old maps are unreliable. Local knowledge, ferries, small boats, and patience matter more than distance. Flooded channels may conceal Blighted beneath apparently still water, making unnecessary noise or disturbance dangerous.
History
The Pale became a major containment zone during the early response to the Blight. As restrictions hardened and settlements emptied, the labor that kept roads drained, waterways managed, and isolated facilities supplied collapsed with them.
The region was not destroyed in a single event. It was abandoned piece by piece until marsh, ruined infrastructure, and quarantine became its defining features.
Present Day
The Pale remains one of Faulmoor's least reliably controlled regions. Flooded farms, broken landing stages, shrines, storage buildings, military remnants, and abandoned settlements still mark the old landscape.
Old routes continue toward Blackholt Fort and the roads leading farther toward Vexenford, but present-day passability changes with weather, water, and local conditions.
Notable Locations
Pale-Edge Ferry Outpost
An unnamed ferry outpost stands on stilts above one of the flooded approaches. Patched timber, tarred supports, lanterns, and a rough dock surround a low barge used for slow crossings into deeper marsh.
Crookbend Station
Crookbend Station is a pre-Blight river shipping and logistics facility. It was eventually overrun after most workers fled and the remainder barricaded themselves inside. The site still bears the marks of hurried evacuation, damaged river infrastructure, and failed defenses.
Lathander Monastery
The Lathander monastery in the Pale remained occupied by a small religious remnant after much of the surrounding region was abandoned. For generations it safeguarded the Emberglass.
The monastery and wider Church of Lathander came to believe that the relic should pass to Lady Elspeth Wilthorne for a religious pilgrimage. The Emberglass has since left the monastery, but the route, destination, and ultimate purpose attributed to that pilgrimage remain uncertain outside the Church.
See Also
- Greymire
- Blackholt Fort
- Crookbend Station
- Lathander Monastery in the Pale
- The Emberglass
- Faulmoor
- Rotmire Blight
Crookbend Station
Crookbend Station is an abandoned river shipping and logistics facility in the Pale. Before the Rotmire Blight, it handled ordinary commercial traffic moving through Faulmoor's river network, including routes connected to Fenmire and the Saltmarshes.
Overview
Crookbend was built for work rather than ceremony. Its surviving structures belong to the practical infrastructure of river trade: loading areas, storage space, access to the water, and the remains of facilities once used to move goods between boats and overland routes.
The station's original importance came from its position within a larger transport network. It was never a sacred site or relic complex, and surviving stories about it concern workers, shipments, routes, and the difficulty of keeping river traffic moving through difficult country.
History
During the spread of the Blight, Crookbend became untenable after a surge or migration of Blighted reached the station.
Most workers fled. Some remained behind and attempted to hold the facility by barricading themselves inside. Those defenses ultimately failed, and the people who stayed were overrun.
Present Day
Crookbend remains abandoned. Evidence of its fall is preserved in the site itself: unfinished work, signs of hurried departure, damaged river infrastructure, makeshift barricades, and the remains of a facility that ceased functioning abruptly rather than being deliberately dismantled.
Its ruin is ordinary in the most unsettling way. Unfinished work, abandoned loading areas, broken equipment, and makeshift barricades preserve the moment when a workplace had to become a refuge and then failed at that too.
The surrounding waterways remain part of the broader hazards of the Pale, where old routes can be difficult to follow and conditions may change faster than surviving maps suggest.
See Also
Lathander Monastery in the Pale
The Lathander monastery in the Pale is an old religious complex within the Pale, partially swallowed by marsh and standing water but never entirely abandoned. Its proper historical name is no longer widely established.
For generations the monastery safeguarded the Emberglass, treating the relic as a sacred trust rather than private property.
Overview
Stone walls and ironwork rise above mud and water around a partially collapsed gateway. Damp has ruined much of the wooden ornamentation, and surviving stained glass is clouded by grime and mold.
What survived here was not grandeur so much as routine: lamps kept filled, blankets folded, books kept dry, and a shrinking community continuing its duties while the country around it emptied.
The occupied portions remained unusually orderly even as the surrounding region emptied. Chairs, books, blankets, lamps, mosaics, and living quarters were maintained by the shrinking monastic community. The principal hall preserves imagery associated with Lathander and renewal, while lower chambers contain older residential rooms, some later sealed or boarded.
History
The monastery predates the quarantine. As the Pale was abandoned, most of its community departed or died, but a small number of monks remained and continued their routines around the relic.
By the time the Emberglass left the site, the surviving clergy and the wider Church believed Lathander had directed it to pass to Lady Elspeth Wilthorne for a pilgrimage. The elderly caretaker surrendered the relic reluctantly but willingly because he understood doing so as an act of obedience.
The Church still treats that transfer as religious duty. The intended route, destination, rites, and final purpose of the pilgrimage are not widely known.
Notable Locations
The Main Hall
The principal worship space contains faded murals and a large cracked mosaic associated with Lathander's traditional themes of light, renewal, and creation.
The Lower Chambers
Stone stairs descend to old monastic rooms. Some remained in use by the final caretakers while others were closed as the community dwindled.
The Elderly Caretaker
The monastery's principal caretaker had served there since his youth. Frail, poor of sight, and dressed in old but carefully maintained robes, he regarded custody of the Emberglass as the central responsibility of his religious life.
His theology emphasized obedience without complete understanding. His personal name is not presently established.
See Also
Blackholt Fort
Blackholt Fort is the largest major fortress in Faulmoor and a longstanding stronghold of House Valkenmar. It lies immediately south of the Pale and historically guarded important routes linking the mainland with Fenmire, Ebonmoor, and the eastern road network.
Overview
Blackholt was built as a military stronghold rather than a town. Heavy stone walls, watchtowers, barracks, storage spaces, and fortified approaches allowed the garrison to control movement through one of Faulmoor's most strategically important corridors.
That change is visible in the people and supplies the fort has had to hold: soldiers beside displaced families, military stores beside emergency shelter, and a stronghold designed for war pressed into the slower work of keeping a collapsing region functioning.
The spread of the Rotmire Blight changed the fort's role. Military duties increasingly overlapped with quarantine enforcement, supply protection, and the sheltering of displaced people moving away from failed settlements.
History
Before the Blight, Blackholt's importance came primarily from its position and garrison. It served as a regional military anchor and supply point for House Valkenmar.
As conditions deteriorated across Faulmoor, the fort became increasingly crowded and portions of its infrastructure were repurposed under emergency conditions. Several lower areas were eventually closed and remain inaccessible.
Present Day
Blackholt remains an important geographic and military landmark south of the Pale. Its walls and surface defenses continue to dominate the surrounding routes even as the wider region has become more difficult to control.
The official explanation for the closure of portions of the lower fort is structural failure. Rumors persist that the abandoned levels contain more than collapsed stone and spoiled stores, but such accounts vary considerably.
Notable Locations
The Surface Fortifications
The fort's surface works remain the part most travelers encounter: guarded approaches, military yards, supply areas, and elevated positions overlooking the routes south of the Pale.
The Closed Lower Levels
Large sections beneath the fort are inaccessible. Official accounts attribute the closure to dangerous structural damage. Stories told by soldiers and refugees offer less certain explanations, including sounds or movement beyond sealed passages.
See Also
The Ash Peaks
“The oldest tunnels do not follow the ore. Miners call them failed workings, but failed workings generally begin by following something worth digging toward.”
— Veydrith Serrin, Lucent Endura
The Ash Peaks are a rugged mountain range in Faulmoor, rising near Valkenheim in a region of dark rock, steep ravines, caves, misted ridges, and difficult passes. They remain only lightly controlled by House Valkenmar and are avoided by most ordinary travel.
Overview
The range is not exceptionally high by the standards of distant mountain country, but it is difficult to cross. Loose shale, hidden sinkholes, deep fissures, sudden fog, cold rain, and poorly mapped routes make even short journeys unpredictable.
Natural caves mix with older cut tunnels and abandoned workings. Some were once used for mining, while others have no clearly remembered purpose.
The Ash Peaks have never supported the kind of settled authority found in Faulmoor's lowlands. Small groups, isolated camps, prospectors, refugees, and travelers may enter the range, but no power maintains dependable control across it.
History
Mining and exploration brought people into the Ash Peaks long before the Rotmire Blight. The Sveerla Mines were once an important excavation site before collapse, flooding, or abandonment ended large-scale work there.
The range also accumulated stories about ruins, buried chambers, and objects older than the institutions of modern Faulmoor. The lack of reliable maps has helped those stories survive because few expeditions can conclusively prove or disprove them.
Present Day
The Blight drove some refugees into the mountains in search of isolation. The peaks offer distance from heavily affected lowlands, but little food, difficult shelter, and no reliable protection.
The range offers the kind of isolation refugees dream about and the kind of terrain that can make isolation lethal: little food, uncertain shelter, bad maps, and no authority close enough to help when something goes wrong.
Whether the Blight has established a lasting presence deep within the range is not publicly settled. House Valkenmar maintains little effective military presence beyond the more accessible approaches.
Explorers and relic-seekers continue to enter despite the risks, particularly those drawn by stories of old mines and the legend of the Hollow King.
Notable Locations
Sveerla Mines
The Sveerla Mines are abandoned workings within the range. Portions are collapsed or flooded, and their deeper extent is uncertain.
Valley of Ash
The Valley of Ash is a barren stretch where fine gray material is carried constantly by the wind. Its origin is unknown in surviving public accounts.
The Shattered Spires
The Shattered Spires are tall, irregular rock formations overlooking part of the range. Some traditions claim they are natural remnants; others interpret them as the eroded remains of something constructed.
Rumors and Legends
The Hollow King
Stories of the Hollow King describe a forgotten warrior or ruler connected to a hidden chamber somewhere beneath the peaks.
One version of the tale claims miners once found a black throne of unfamiliar metal deep below the Sveerla Mines before the route to it was sealed or lost.
The Crown of the Hollow King
No publicly verified recovery of the crown is known, and stories about its powers differ widely.
See Also
Southvale
Southvale is a river-and-farm settlement in Faulmoor whose relative fertility and livable terrain made it a refuge for wealth during the Rotmire Blight. What began as a small agricultural community changed rapidly as affluent refugees settled permanently and built fortified private estates beside the town's older homes.
Overview
Southvale occupies unusually productive country by Faulmoor standards. Farms, orchards, river access, and reliable produce gave the settlement value before the Blight and made it even more desirable once food became scarce elsewhere.
Southvale survived well enough to become desirable, and that success proved corrosive. The town still grows food while many families who once worked its fields can no longer afford the security that wealth purchased around them.
The influx of wealthy refugees altered the town's physical and social structure. Imported materials and private construction produced larger fortified estates beside older stone cottages and timber homes. Original residents increasingly found themselves pushed toward service work, overcrowded housing, poverty, or displacement.
Southvale has a modest wall and guarded checkpoints, but private mercenaries, money, and control of supplies matter more than conventional military strength.
History
Before the Blight, Southvale was known primarily as a small agricultural and river settlement.
The crisis brought people with enough wealth to purchase safety, property, labor, and food. A temporary refuge gradually became a permanent enclave, concentrating resources in the hands of newcomers while making access to ordinary necessities less equal.
Southvale's dark purple plums were expensive even before the Blight and have become nearly impossible to obtain outside the settlement, a small luxury that now carries outsized symbolic value.
Present Day
Class tension defines Southvale. Food, medicine, silver, protected housing, and armed security are distributed unevenly, and resentment toward wealthy residents has hardened as the wider crisis continues.
An executioner or persona known as the Copper Judge is blamed for killings of wealthy or corrupt figures. Victims are associated with copper coins forced into the mouth or throat. To the town's elite, the Judge is a murderer. To some among the poor, the figure represents vengeance against people believed to have purchased survival at everyone else's expense.
Notable Locations
The Gilded Pits
The Gilded Pits are an established Southvale location associated with the town's wealth and social divisions.
The Hearth & Oak Tavern
The Hearth & Oak Tavern is one of Southvale's established public houses.
The Lantern's Hollow
The Lantern's Hollow is another persistent location in local accounts, though its fuller role has not yet been firmly established in current public Lore.
See Also
The Harrowgate Ruins
“Three expeditions have called Harrowgate a temple. None identified an altar, sanctuary, or arrangement that requires worship as an explanation. We should be more careful with the word sacred.”
— Veydrith Serrin, Lucent Endura
The Harrowgate Ruins are a partially submerged complex southeast of Valkenheim, where the mountains meet the marsh. Only fragments remain above the mire, while flooded chambers, buried structures, and unusual objects suggest that much more lies beneath the surface.
Overview
Harrowgate is difficult to interpret even by the standards of Faulmoor's older ruins. Jagged black stone rises from reeds and standing water, while passages descend into flooded spaces that have never been fully mapped.
Harrowgate endures partly because nobody agrees what it was. Pilgrims, scholars, scavengers, and marshfolk approach the same stones with different expectations and leave with accounts that rarely fit neatly together.
The site attracts several kinds of visitors. Pilgrims of the Old Ways come seeking visions, signs, or divine understanding. Scholars and explorers seek physical evidence of the region's forgotten past. Scavengers come hoping to recover relics or unusual materials.
Local stories are less welcoming. Marshfolk describe strange lights beneath the water, disorientation, unexplained voices, and travelers who fail to return.
History
The original purpose of Harrowgate is unknown. No surviving public account establishes whether it was a fortress, settlement, sacred site, or something else.
The ruin appears older than the institutions now surrounding it. Marsh and floodwater have swallowed much of the site, leaving only fragments visible above ground.
Over time, its unexplained phenomena and occasional relic recoveries turned Harrowgate into both a place of pilgrimage and a source of local superstition.
Present Day
Harrowgate remains only partially explored. Flooded tunnels and submerged chambers make investigation difficult, and reports from different visitors often contradict one another.
Pilgrims continue to visit despite the danger. Some claim to receive visions or hear echoes they interpret as divine. Others leave with nothing more than damaged equipment and stories about shifting passages, cold stone, or lights under the water.
Small unusual objects have been recovered from the site over the years, enough to sustain continued interest without establishing that Harrowgate contains any single great treasure.
Notable Locations
The Black Arch
The Black Arch is one of the most recognizable surviving structures above the mire, a damaged gateway noted for remaining unusually cold to the touch.
The Flooded Passages
Submerged corridors and chambers extend beneath the visible ruins. Their full extent is unknown.
See Also
Ebonmoor Overview
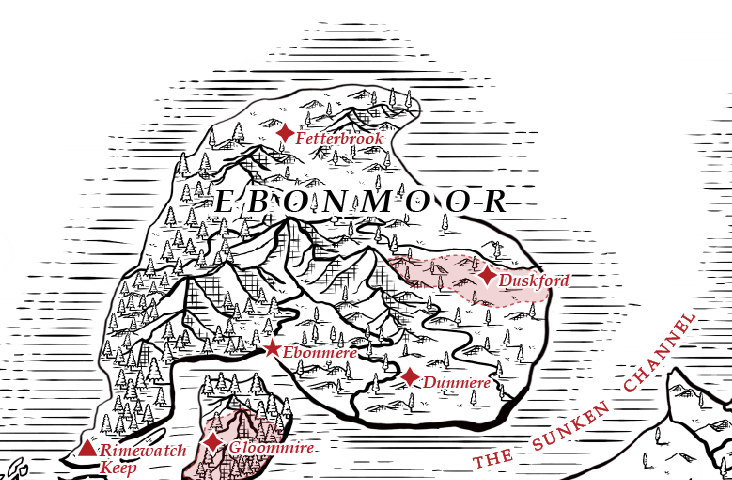
Ebonmoor is the island domain of House Wilthorne, separated from mainland Faulmoor by water and reached by a strategically important crossing controlled through Vexenford and Rimewatch Keep. Its misted moors, forests, river valleys, ports, and defensible approaches have made the island both a trading center and a comparatively protected refuge during the Rotmire Blight.
Overview
Ebonmoor's geography has always favored control of movement. The island's settlements depend on coastal and river trade, while its mainland connection can be watched, restricted, or closed more readily than an open frontier.
The island's relative safety is built on controlled movement, making every bridge, harbor, ferry, and grain route part of its politics as well as its ordinary economy.
Before the Blight, that position supported a close political and economic relationship between House Wilthorne and House Valkenmar. Trade, military cooperation, marriage ties, and shared governance helped bind Ebonmoor into Faulmoor's wider political order.
The Blight has made that same geography more valuable. Isolation offers some protection, while the crossing and ports give House Wilthorne influence over who and what enters the island. Maritime commerce, ferry traffic, fishing, agriculture, and the movement of supplies between settlements remain essential to ordinary life.
History
House Wilthorne long served as one of House Valkenmar's principal vassals. Ebonmoor's trade and defensible position made it a major asset to the barony, and the two houses were historically close.
That relationship has become increasingly strained during the Blight. Harsh containment policies, disrupted commerce, and the need to protect local resources have pushed Ebonmoor toward greater practical independence even while the older political structure remains in place.
The destruction of Velmere, now commonly called the Gloom, became one of the island's defining Blight-era events. Its bridges were destroyed during containment, isolating the city and leaving a ruin that still shapes how Ebonmoor thinks about sacrifice and quarantine.
Present Day
Ebonmoor remains more functional than many heavily affected parts of mainland Faulmoor, but the island is not untouched by the crisis. Quarantines, damaged routes, smuggling, closed settlements, food pressure, and shortages shape movement across the region.
Control of the crossing at Rimewatch and the island's ports gives House Wilthorne unusual leverage. That authority is visible at checkpoints and harbors, but survival also depends on merchants, farmers, sailors, ferrymen, and local communities keeping goods moving between places that can no longer rely on old routes.
The island's relative stability is therefore uneven. One settlement may remain productive while another is quarantined, cut off, or dependent on increasingly unreliable supply lines.
Notable Locations
Ebonmere
Ebonmere is the capital of Ebonmoor and the seat of House Wilthorne. Its coastal position and maritime trade make it the island's principal political and commercial center.
Rimewatch Keep
Rimewatch Keep guards the island side of the major crossing from the mainland and serves as one of House Wilthorne's most important checkpoints.
Duskford
Duskford was one of Ebonmoor's principal agricultural settlements before a sudden Blight outbreak destroyed the town and much of its surrounding farmland.
Dunmere
Dunmere is now one of Ebonmoor's most important surviving food-producing settlements, though a severe unexplained sickness among its livestock threatens that role.
Fetterbrook
Fetterbrook is an old forest retreat whose dependence on outside supplies became dangerous after Duskford's fall cut the settlement off from its former routes.
The Gloom
The Gloom is the ruined city once called Velmere. It was deliberately cut off during the Blight and remains one of Ebonmoor's most visible symbols of containment by sacrifice.
See Also
House Wilthorne of Ebonmoor
“The Black Thorn Strikes Deep.”
— House Wilthorne motto
House Wilthorne rules Ebonmoor from Ebonmere as a major vassal house of House Valkenmar. Its public image favors patience, diplomacy, and carefully applied pressure over open displays of force.
Overview
Before the Rotmire Blight, House Wilthorne was one of Valkenmar's closest political partners. Ebonmoor's ports, defensible approaches, military value, and trade connections made the house essential to the wider stability of Faulmoor.
For ordinary travelers, Wilthorne power is encountered less through ceremony than through movement: whether a bridge opens, a ship clears harbor, a cargo is inspected, or passage onto Ebonmoor is allowed at all.
The crisis has changed that relationship. Ebonmoor's relative isolation and control of important crossings have made Wilthorne decisions increasingly consequential, while harsh mainland containment policies and disrupted trade have strained older loyalties.
History
The Wilthornes built their influence through Ebonmoor's strategic geography and a longstanding relationship with House Valkenmar. Trade, defense, diplomacy, and family connections tied the two houses closely together.
Their family motto reflects the house's preferred image of power: pressure applied carefully, patiently, and at the point where it matters most.
Present Day
Lord Eadric Wilthorne heads the house during a period of increasing uncertainty between Ebonmoor and the mainland. The house continues to control important trade and access routes, including the Ebonmoor side of the crossing through Rimewatch Keep.
Its tighter control of crossings, trade, and Ebonmoor's resources has made the strain with House Valkenmar increasingly visible. Whether this reflects temporary emergency policy or a deeper political shift is not publicly settled.
Lady Elspeth Wilthorne is publicly associated with religious devotion and interest in relics, adding another source of attention to the family beyond its political and commercial role.
Major Members
Lord Eadric Wilthorne heads the house. His household includes Lady Elspeth Wilthorne and their adult children, Eadric Wilthorne II and Seraphine Wilthorne.
See Also
Ebonmoor Locations
Ebonmoor, once a bastion of honor and loyalty, now stands at a precipice, its fate uncertain in the wake of the Rotmire Blight. Before the sickness took hold, House Wilthorne and House Valkenmar were inseparable, their alliance one of mutual benefit and unwavering trust. Together, they strengthened Faulmoor, ensuring its dominion over the treacherous marshlands while securing their influence across Norvostra. Ebonmoor flourished under this partnership, its wealth growing through trade and its disciplined people serving as a stabilizing force in the region.
Ebonmere
“Ebonmoor will rise, as it always has, on its own terms.”
— Lord Eadric Wilthorne
Ebonmere is the capital of Ebonmoor and the seat of House Wilthorne. Built around towering sea-facing cliffs and a major harbor, the city combines old chambers cut directly into the rock with later districts of stone and timber that spread outward above the coast.
Overview
The oldest parts of Ebonmere are carved into the cliffs. Their builders and original purpose are no longer clearly remembered, but many of the surviving halls remain in use as civic, noble, and religious spaces.
Its harbor still works, which means the city still wakes to cargo, repairs, bargaining, and departures even while every movement of people or goods carries greater political weight than it once did.
Below and around those older structures, Ebonmere developed into a maritime city of docks, shipyards, warehouses, markets, and merchants. Sheltered approaches and generations of seafaring expertise made its harbor one of the most important points of trade in Faulmoor.
The city has remained more functional than many settlements affected by the Rotmire Blight. Ships still arrive and depart, goods still move through the harbor, and skilled sailors and shipwrights remain central to local life.
History
“Ebonmere was not simply built upon older foundations. Portions of the city occupy chambers whose corridors continue behind later walls and whose stairs descend below the present waterline. Whatever stood here first was considerably larger than what survives.”
— from the Ebonmere surveys of Veydrith Serrin, Lucent Endura
Ebonmere's cliffside halls are older than the present political order of Faulmoor. Later generations expanded the settlement outward and turned its natural harbor into the commercial center of Ebonmoor.
Trade tied Ebonmere closely to the mainland and helped support the long alliance between House Wilthorne and House Valkenmar. Those same connections became sources of tension once quarantine, scarcity, and control of movement became matters of survival.
Present Day
Ebonmere remains a working port, but the Blight has changed what moves through it and who is allowed to travel.
Smuggling has expanded alongside legitimate commerce. Refugees, relics, silver, restricted goods, and private passage all command high prices, and accusations of noble protection or participation are common. The true extent of House Wilthorne's direct involvement is not publicly settled.
Political distance from the mainland has also become more visible. Some residents argue that Ebonmoor's survival depends on stricter isolation, while others remain tied economically or politically to Faulmoor.
Notable Locations
The Tidecourt
The Tidecourt is the seat of House Wilthorne, occupying a network of old chambers carved into the cliffs. It remains the principal center of noble government in Ebonmere.
The Gilded Tide
The Gilded Tide is a waterfront tavern associated with sailors, traders, and the city's less official commerce. Its reputation is closely tied to smuggling and discreet passage.
The Saltspire
The Saltspire is a prominent merchant hall overlooking the harbor. It serves established commercial interests while carrying a reputation for transactions involving rare and restricted goods.
The Widow's Walk
The Widow's Walk is a cliffside temple and crypt associated with mourning those lost at sea. Driftwood offerings and memorial rites remain part of its local tradition.
See Also
The Gloom
The Gloom is the common modern name for the ruined city historically called Velmere, once one of Ebonmoor's great trade centers. The city was deliberately sacrificed during the early spread of the Rotmire Blight: its ports were burned, its bridges were severed, and its population was abandoned in an attempt to stop the catastrophe from spreading farther.
Smoke still rises from the ruins years later.
Overview
Velmere's importance came from trade and from the bridges and causeways that connected its commercial network. Large construction projects were underway when the Blight reached the city, drawing laborers, merchants, sailors, and materials into crowded districts near the harbor.
The ruins retain the shape of that unfinished expansion. Broken bridgeworks, burned docks, abandoned construction sites, storehouses, timber yards, and damaged streets remain cut off from the routes they were built to serve.
The persistent smoke gave the ruins their current name. From elevated parts of Vexenford, the dark column over the Gloom remains visible across the water.
History
The first outbreak spread through crowded waterfront and labor districts while the scale of the Blight was still poorly understood.
Once the danger became undeniable, the response was deliberate. House Wilthorne and the Baronial authorities chose containment over evacuation. Ships and ports were burned, bridges linking the city to surrounding routes were destroyed, and outside assistance was withdrawn.
The measures helped isolate the outbreak, but they also trapped the people who remained.
Velmere did not simply collapse. It was sacrificed.
Present Day
No serious effort has reclaimed the city. The broken approaches and continuing presence of Blighted make ordinary travel into the ruins extremely dangerous.
What remains is not merely a ruin but the physical record of a decision: bridges cut behind people, ships burned beside them, and an entire city made into the boundary of a quarantine.
Stockpiled materials, tools, abandoned goods, and unfinished infrastructure continue to attract scavengers and relic-seekers despite that danger.
The name Velmere remains the historical name of the city. The Gloom refers to what it became after its destruction.
Notable Locations
The Broken Bridges
The surviving bridge remains are the clearest evidence of the city's former role as a trade hub and of the deliberate measures used to isolate it.
The Burned Harbor
Velmere's harbor was intentionally destroyed during containment. Wrecked docks, vessels, warehouses, and waterfront structures remain among the most dangerous parts of the ruin.
The Construction Districts
Large sections of the city were still being expanded when the outbreak occurred. Abandoned work camps and unfinished structures remain around the ruined approaches.
See Also
Rimewatch Keep
“I tell myself I'm keeping Ebonmoor safe. At night, I still see the faces of the people we turned away.”
— Sergeant Willem Grast, Rimewatch garrison
Rimewatch Keep is a fortified cliffside stronghold controlling the Ebonmoor end of the principal crossing from Vexenford. Under House Wilthorne, it has changed from a military gateway and trade post into one of the island's most severe quarantine checkpoints.
Overview
The keep occupies high ground above the water and the crossing, giving its garrison control over travelers, cargo, and access to Ebonmoor.
A small fishing and farming settlement developed beneath its protection during more peaceful generations. Docks, homes, markets, and services grew around the garrison because merchants and travelers regularly waited there before crossing.
The Rotmire Blight changed that relationship. Rimewatch now exists primarily to control entry, and the community beneath the keep lives under the same suspicion applied to outsiders.
History
Rimewatch predates the current political relationship between House Wilthorne and House Valkenmar. It was built during an older period of rivalry to guard the crossing, coastline, and approaches to Ebonmoor.
As relations stabilized, the fortress became a gateway rather than a frontier bastion. Trade and diplomacy passed through the crossing, and the settlement beneath the walls prospered from the traffic.
The destruction of Velmere, now the Gloom, changed Rimewatch's purpose almost overnight. The crossing was militarized, inspections hardened, and preventing possible Blight exposure became the keep's defining duty.
Present Day
Rimewatch remains under strict military control. Travelers are searched and examined before passage, and suspected illness may result in detention, refusal, exile, or worse.
The checkpoint's necessity and cruelty are difficult to separate cleanly. Every traveler turned away may represent a danger kept off the island or a person abandoned on the wrong side of the gate.
The bridge remains open, but movement is tightly restricted. The relationship between soldiers on the two sides of the crossing has grown more distrustful as Ebonmoor and mainland Faulmoor pursue increasingly different priorities.
The village beneath the keep continues to function, though fishing, farming, trade, and ordinary hospitality all operate under the pressure of quarantine enforcement.
Notable Locations
The Watcher's Gate
The Watcher's Gate is the principal inspection and holding point at the Ebonmoor end of the crossing. Travelers and cargo are processed here before being allowed farther onto the island.
The Iron Spire
The Iron Spire is the keep's forge and armory. Its work increasingly serves the garrison first, leaving less capacity for civilian commissions and repairs.
The Stone Flask
The Stone Flask is an inn and tavern near the fortress, historically used by merchants, soldiers, and travelers waiting to cross.
Notable People
Captain Edric Faulke commands the checkpoint and is publicly associated with uncompromising quarantine enforcement.
See Also
Dunmere
Dunmere is one of Ebonmoor's most important surviving agricultural settlements. Its grain fields, livestock, butchers, and food stores became critical after the fall of Duskford, when refugees and farm workers expanded local production in an attempt to replace what the island had lost.
That effort is now threatened by a severe sickness among Dunmere's livestock.
Overview
Dunmere was built around fertile fields, pastures, river water, cattle, hogs, grain, and the trades needed to preserve and distribute food. Agriculture shaped ordinary life more strongly than noble politics, and local families developed long traditions of farming, herding, butchery, smoking, and preservation.
After Duskford fell, displaced people arrived in Dunmere and helped expand fields, irrigation, storage, and livestock enclosures. The town became even more important to Ebonmoor's food supply.
Crops still grow, but the livestock are failing. Cattle become restless, refuse food, develop darkened veins and swelling, and may deteriorate rapidly. The symptoms resemble the Rotmire Blight closely enough to cause fear, though no cause has been publicly established and Dunmere's people have not shown the same pattern.
History
Dunmere and Duskford once formed the agricultural backbone of Ebonmoor. Dunmere produced much of the food while Duskford helped move surplus into wider trade.
Duskford's fall severed that relationship and placed enormous pressure on Dunmere. Production was expanded, refugees were absorbed into the agricultural workforce, and House Wilthorne increased defenses along the routes leading toward the ruined district.
The livestock sickness emerged after Dunmere had already become the island's most important remaining food source.
Present Day
Food production continues under strain. Grain and vegetables remain available, while meat and livestock reserves decline.
That makes every sick animal more than a farmer's loss. Each failed herd threatens butchers, stores, rationing, transport, and the island communities that now depend on Dunmere to replace what Duskford once produced.
Rumors blame river water, corrupted soil, air, the Blight itself, or divine punishment. None of these explanations is publicly proven.
Local decisions are increasingly made through a council of farmers and butchers operating beneath the broader authority of House Wilthorne. Rationing, culling, military protection, hoarding, and smuggling have all become sources of tension.
Notable Locations
Stonehall Market
Stonehall Market was once the center of regional agricultural trade. It now serves as a major point for rationing, controlled sales, and disputes over dwindling supplies.
Kaelssen Ranch
Kaelssen Ranch is one of Dunmere's largest livestock operations and has been heavily affected by the current animal sickness.
The Farmer's Keep
The Farmer's Keep is the principal meeting place for the local agricultural council and for decisions concerning food distribution and livestock culling.
The River Gate
The River Gate is a principal access point to the waterways that feed Dunmere's fields and herds. Because the cause of the livestock sickness is unknown, the water itself has become a source of suspicion.
See Also
Duskford
“That ship just sat there. No sails, no lanterns, no crew I could see. Then folk started getting sick.”
— Renholt Grayne, former fisherman of Duskford
Duskford is a ruined agricultural settlement in Ebonmoor whose sudden fall destroyed one of the island's most important food-producing districts and severed the routes leading north toward Fetterbrook.
Overview
Before the Rotmire Blight, Duskford and Dunmere formed the agricultural core of Ebonmoor. Fertile fields, reliable water, granaries, and organized farming estates supplied food to Ebonmere and supported trade beyond the island.
For a time after the destruction of Velmere, Ebonmoor's containment measures appeared to have protected the interior. Duskford's later collapse therefore caused as much suspicion as fear.
The outbreak spread rapidly. Fields, farmhouses, granaries, and roads were abandoned, and the routes north became unsafe.
History
Duskford remained productive after the first major Blight disasters elsewhere in the region.
According to surviving accounts, a strange vessel was seen offshore shortly before people began falling ill. The ship later disappeared. This story became the foundation for widespread claims that the Blight had been brought to Duskford deliberately.
Some rumors accuse mainland interests or even Baronial authorities of arranging the outbreak to weaken Ebonmoor. No public evidence establishes those accusations as fact.
Whatever its cause, Duskford fell quickly and its loss dramatically reduced Ebonmoor's food security.
Present Day
Duskford is considered lost. Former farmland is corrupted, storehouses and granaries are abandoned, and Blighted remain throughout the district.
Its loss is felt far beyond the ruins: empty granaries increase pressure elsewhere, broken routes isolate Fetterbrook, and Dunmere now carries a burden that the two agricultural settlements once shared.
The settlement's fall also isolated Fetterbrook from its former supply routes. Travel through the ruined agricultural country is now largely limited to smugglers, hunters, scavengers, and others willing to accept the risk.
With Duskford gone, Dunmere carries much more of the burden of feeding Ebonmoor.
Notable Locations
The Granaries
Duskford's large grain stores once held agricultural surplus for Ebonmoor. Many remain standing but are considered unsafe.
The Farmlands
The fields surrounding Duskford were among the island's most productive. They are now associated with corrupted soil, abandoned farmsteads, and wandering Blighted.
See Also
Fetterbrook
Fetterbrook is an old forest settlement in northern Ebonmoor, built among streams, hunting grounds, and former noble estates. For generations it functioned more as a retreat than a self-sufficient town, depending on regular supplies moving through Duskford.
Duskford's fall left Fetterbrook isolated.
Overview
The settlement grew from private estates used for hunting, fishing, falconry, and seasonal retreat. Craftspeople, gamekeepers, servants, traders, and hunters gradually formed a permanent community around them.
That comfortable arrangement depended on outside food, medicine, tools, and trade. The surrounding forests could supplement those supplies but were never expected to support the entire settlement indefinitely.
When Duskford fell, the routes that had sustained Fetterbrook were severed. Many nobles departed, leaving estates, workers, and long-term residents behind.
History
Fetterbrook is among Ebonmoor's older settlements. Its forests and waterways made it attractive as a retreat for families seeking distance from larger political centers.
For generations, regular supply lines allowed the town to specialize in hunting, falconry, leatherwork, woodcraft, and leisure rather than agricultural self-sufficiency.
The Rotmire Blight broke that system when Duskford was lost and the approaches through the agricultural district became unsafe.
Present Day
Those who remain hunt, forage, ration supplies, and reuse abandoned estates as shelter. The settlement is not entirely empty, but its long-term survival is uncertain.
The old luxury of remoteness became a trap when its supply route failed. Manor houses built for seasonal comfort now shelter people counting stores, hunting for food, and watching the water downstream for the next reason to worry.
Another source of fear lies downstream. Bodies have increasingly been found along waterways south of Fetterbrook. Some show signs associated with the Blight; others do not. Their origin and cause of death are not publicly known.
The reports have made communities farther south increasingly suspicious of the water flowing from the region.
Notable Locations
The Falcon's Rest
The Falcon's Rest was a training ground for hunting birds. Most of its aviaries are now empty, though parts of the facility remain in use.
The Old Manors
Former noble estates stand throughout the surrounding forest. Some are abandoned, while others have been converted into communal shelters.
Hunter's Hall
Hunter's Hall serves as a meeting place and rationing center for many of those who remain in Fetterbrook.
See Also
Fenmire Overview
Fenmire is a marsh region of Faulmoor ruled, where it can be ruled at all, by House Harrowden. Deep bogs, brackish channels, sinking peat, raised settlements, ferries, and pole-boats define a landscape where water has always mattered more than roads. The discovery of major silver deposits transformed Fenmire from a neglected backwater into one of the barony's most strategically important regions.

Overview
Permanent construction in Fenmire is difficult. Settlements cluster on firmer ground, raised platforms, stilts, salvaged stone, and older foundations. Travel depends heavily on local knowledge of waterways, islands, changing channels, and safe ground.
Living here means treating movement as skilled work. A short route may depend on a boat, a remembered channel, a raised platform, or someone who knows which patch of ground will still be ground tomorrow.
Fishing, trapping, foraging, ferry traffic, and small-scale trade support much of ordinary life. Conventional farming is difficult, and the region's isolation has encouraged communities that are practical, suspicious of outside authority, and accustomed to solving problems locally.
The Thornmere silver deposits altered Fenmire's place within Faulmoor. Silver was valuable before the Rotmire Blight and became essential afterward, giving House Harrowden political leverage that geography alone had never provided.
History
House Harrowden historically exercised uneven authority across scattered marsh communities through bargains, local arrangements, and control of the few routes that could be reliably taxed or defended.
The discovery of silver at Thornmere strengthened the house dramatically. What had once been peripheral territory became economically indispensable.
During the Blight, House Harrowden pursued isolation. Bridges and land routes were destroyed or abandoned, pushing more movement onto controlled waterways and ferries. This protected some interior settlements while leaving others cut off or exposed.
The fall of Gristmere damaged older transport and trade routes further, increasing the importance of ferries, local boats, and settlements able to maintain dependable landing points.
Present Day
Fenmire remains difficult to enter and difficult to govern. Water routes are essential, overland travel is unreliable, and many settlements depend upon local ferries or small craft.
Silver remains the region's greatest source of influence. Rumors that the Thornmere veins are failing circulate widely, while others insist scarcity is being exaggerated to preserve Harrowden leverage. Whatever the truth, access to silver is tightly controlled and politically charged.
The Blight has made fishing, scavenging, and movement through the marsh more dangerous. Some communities have turned inward, while others survive through smuggling, barter, and arrangements that would have been illegal or unnecessary before the crisis.
Notable Locations
Fenwatch
Fenwatch is the principal seat of House Harrowden and the closest thing Fenmire has to a conventional political center.
Mirefield
Mirefield is a fortified settlement associated with Harrowden authority and defensive efforts against the worsening conditions of the marsh.
Thornmere Mines
The Thornmere Mines are Fenmire's most strategically important economic site and one of Faulmoor's crucial remaining sources of silver.
Bogsend
Bogsend occupies unusually dependable ground within the marsh and has become a refuge for people seeking distance from failing settlements and noble authority.
Gristmere
Gristmere's fall helped sever older transport and trade routes through Fenmire, accelerating the region's isolation.
Weeping Fen
Weeping Fen grew around rich fishing grounds and much older buried stonework. It is now silent, with supply boats and scouts failing to return.
The Blasted Hearth
The Blasted Hearth is a partially submerged ruin on an isolated island, historically called the Pale Ruins in some older accounts. It remains associated with pilgrimage, relic-seeking, and unsettling reports from those who approach it.
See Also
House Harrowden of Fenmire
“By Mire and Might.”
— House Harrowden motto
House Harrowden is the ruling house of Fenmire and a vassal of House Valkenmar. Once politically marginal, the house gained enormous importance after the discovery of rich silver deposits at Thornmere and became indispensable after the Rotmire Blight turned silver into a strategic survival resource.
Overview
Fenmire has never been easy territory to govern. Scattered settlements, difficult waterways, independent marsh communities, and unreliable overland routes limited the reach of any central authority long before the Blight.
From Fenwatch, House Harrowden historically maintained influence through bargains, local agreements, payments, and control of key routes rather than through complete administrative dominance.
The Thornmere silver discoveries changed the house's position. A family once treated as a necessary backwater vassal suddenly controlled a resource every major power in Faulmoor needed.
History
Before the silver boom, House Harrowden possessed title and territory without comparable wealth or influence. Thornmere transformed that balance and made Fenmire central to Faulmoor's economy.
When the Blight spread, Harrowden policy turned sharply toward isolation. Bridges and land routes were destroyed or abandoned, and movement increasingly shifted onto ferries and waterways that could be watched and controlled.
These choices protected portions of Fenmire while also earning the house a reputation for withholding resources and abandoning those outside its chosen defensive lines.
Present Day
House Harrowden's leverage rests heavily on silver. The region's mines remain guarded, access is restricted, and every fluctuation in supply has political consequences throughout Faulmoor.
Rumors about the state of the Thornmere veins are persistent. Some claim the mines are nearly exhausted; others believe scarcity is exaggerated to preserve Harrowden's bargaining power. The truth is not publicly settled.
Relations with House Valkenmar remain defined by necessity and resentment, while dealings with House Wilthorne are cautious and transactional.
Major Members
Lord Garric Harrowden heads the house from Fenmire. His daughter Marla Harrowden is a prominent Harrowden authority associated with Mirefield.
See Also
- Fenmire
- Fenwatch
- Thornmere Mines
- Mirefield
- Faulmoor
- House Valkenmar
- House Wilthorne
- Silver and its Importance
Fenmire Locations
Fenmire, the most forsaken region of Faulmoor, is a vast expanse of deep bogs, brackish fens, and mist-choked waterways stretching toward the Greymere Sea. The land is half-drowned, characterized by sinking peat, twisted mangroves, and decaying reeds, making travel treacherous. Villages, when they can be built at all, are precariously perched atop raised wooden platforms, stilts, or half-sunken ruins from ages past, a patchwork of resilience against a land that does not welcome habitation.
Fenwatch
“The swamp rises to claim it, the Blight knocks at its gates, but we remain.”
— Lord Garric Harrowden
Fenwatch is the capital of Fenmire and the principal seat of House Harrowden. Built where several navigable waterways meet, the settlement grew from a rough marsh trading post into the region's political and commercial center.
Overview
Fenwatch is built to survive unstable ground rather than conquer it. Much of the town stands on heavy pilings, raised platforms, boardwalks, and rope bridges above waterlogged earth. Treated timber, salvaged stone, drainage works, and improvised flood barriers are common features of construction.
Water routes matter more than streets. Boats, ferries, traders, fishers, smugglers, and laborers move through the same channels, making the town both a point of control and a place where official authority is constantly negotiated.
House Harrowden's strongest structures stand on the firmer ground available around the settlement. Watchtowers, palisades, hired guards, and fortified buildings protect the principal approaches.
History
Fenwatch began as a trading post used by merchants, trappers, laborers, and fortune-seekers moving deeper into the fens.
House Harrowden gradually established control through force, agreements, and command of important supply routes. The discovery of silver at Thornmere Mines transformed both the town and the house, bringing greater wealth, permanent fortifications, and political attention from the rest of Faulmoor.
Present Day
The Rotmire Blight has made Fenwatch more guarded without making it orderly. Suspected exposure can bring exile, detention, or removal from the settlement, while bodies believed to be Blighted are burned outside the inhabited districts.
Daily life is organized around water and scarcity: boardwalks have to hold, boats have to arrive, bodies have to be burned, and every consignment of silver or medicine invites inspection, bargaining, or theft.
Merchants and travelers face inspections, and corruption has grown alongside enforcement. Smuggling remains common because silver, medicine, food, weapons, and passage through the marsh are all increasingly valuable.
Rumors that House Harrowden hoards silver or manipulates scarcity circulate widely, though the true condition of the Thornmere veins is not publicly settled.
Notable Locations
Harrow's Rest
Harrow's Rest is House Harrowden's fortified seat in Fenwatch. Built from imported stone and iron on firmer ground, it stands apart from much of the town's raised timber construction.
The Sunken Stoat
The Sunken Stoat is a dockside tavern known for smugglers, mercenaries, travelers, and those seeking work away from official attention.
The Drowned Market
The Drowned Market is a floating bazaar where traders deal in marsh goods, salvaged materials, herbs, and other difficult-to-source wares.
See Also
Mirefield
“I will not let Mirefield fall.”
— Governor Marla Harrowden
Mirefield is a fortified settlement in Fenmire governed by Marla Harrowden on behalf of House Harrowden. Once an important waypoint on the region's overland routes, it became increasingly isolated after the fall of Gristmere severed its principal connection to the north.
Overview
Mirefield occupies firmer ground than many Fenmire settlements and has long relied on stonework, defensive walls, and controlled approaches.
Before the Blight, roads, ferries, markets, inns, smithies, and regional trade made the town an important stop between other Fenmire settlements. Gristmere's fall changed that pattern. Travel now depends heavily on ferries and island-hopping routes that connect Mirefield with Fenwatch and other surviving communities.
Refugees from Gristmere increased the strain on housing and supplies while also providing labor for fortification, transport, and defense.
History
Mirefield's position and access to stone made it both a trade town and a defensible regional stronghold.
As the Rotmire Blight spread, Governor Marla Harrowden expanded the town's defenses. Old passes were blocked, walls reinforced, watchtowers manned, and militia forces increased.
The destruction of Gristmere isolated Mirefield further and converted what had once been a commercial center into a settlement organized increasingly around survival and defense.
Present Day
Mirefield remains functional but heavily militarized. Markets operate under rationing, blacksmiths devote much of their labor to weapons and fortifications, and patrols watch the approaches.
The town increasingly spends its labor on the simple work of remaining a town: smiths make repairs and weapons, ferries keep supply lines alive, displaced people reinforce defenses, and rationing turns ordinary market days into questions of endurance.
Ferries are now a lifeline, carrying supplies and people through routes that are increasingly difficult to keep open.
Concern has also grown over the silence surrounding Weeping Fen. Missing ferrymen and scouts, together with rumors concerning something called the Last God, have deepened anxiety along Mirefield's southern routes.
Notable Locations
Bastion Hall
Bastion Hall serves as Mirefield's military command center and Governor Marla Harrowden's principal seat of authority.
The Anvil & Ash
The Anvil & Ash is a blacksmithing guild whose work has shifted heavily toward arms, armor, repairs, and defensive construction.
The Stone Drake Inn
The Stone Drake is a fortified inn serving soldiers, travelers, ferrymen, and displaced people.
The Drowned Bell
The Drowned Bell is a harbor tavern associated with ferrymen, mercenaries, and the less regulated parts of Mirefield's trade.
Notable People
Marla Harrowden
Marla Harrowden governs Mirefield and directs its defensive preparations on behalf of House Harrowden.
See Also
Gristmere
“The bridges had to burn, lest the Blight cross with them.”
— Lord Garric Harrowden
Gristmere is a ruined marsh settlement in Fenmire, now half-submerged and cut off from the routes it once served. Its fall during the Rotmire Blight disrupted travel toward Mirefield and Weeping Fen and became one of the major causes of the region's present isolation.
Overview
Before its destruction, Gristmere was built around canals, raised walkways, stilted homes, and the movement of trade through difficult wetland.
Much of that structure remains in broken form. Walkways sag into stagnant water, houses lean from failing pilings, and former market spaces lie partly submerged beneath mud and reeds.
The settlement's location still makes it useful to smugglers, scavengers, and travelers willing to cross dangerous ruins rather than take longer routes through the marsh.
History
When the Blight reached Gristmere, House Harrowden attempted quarantine. Barricades and checkpoints were raised along the roads, and people attempting to leave without approval were turned back.
What ruined Gristmere was not only death but disconnection. Burning its bridges limited movement through the town while also cutting other communities away from routes they had depended on for trade and travel.
The containment failed. Once the settlement was considered lost, the bridges connecting Gristmere to the rest of Fenmire were burned.
That decision limited movement through the area but also severed older routes and helped isolate communities farther south.
Present Day
Gristmere remains abandoned and dangerous. Blighted move through the flooded ruins, while the condition of submerged buildings and walkways makes travel hazardous even without them.
A persistent rumor claims that a shipment of silver bound for Mirefield disappeared during the town's final days and remains somewhere within the ruins. Treasure hunters and mercenaries continue to search for it, although no confirmed recovery is publicly known.
Stories of strange lights, voices, and unsettling dreams also circulate among those who camp near Gristmere. Their cause is unknown.
Notable Locations
The Drowned Walkways
The remains of Gristmere's raised streets and bridges form a broken network above and beneath the marsh water.
The Old Market
The former market district is largely submerged, with only portions of stalls and structures still visible above the waterline.
See Also
Bogsend
“We are not the lost. We are the ones who endure.”
— Captain Dain Harthollow
Bogsend is a remote settlement in Fenmire that has developed into an effectively independent refuge beyond the ordinary reach of House Harrowden. Difficult approaches, dependable local resources, and an influx of deserters and refugees have allowed it to survive with unusual autonomy during the Rotmire Blight.
Overview
Bogsend occupies unusually useful ground within the marsh, with access to fresh water, fish, game, forage, and small areas suitable for marsh-grown crops.
There are no reliable roads into the settlement. Footpaths and winding waterways serve as the principal approaches, making Bogsend difficult to reach without local knowledge.
The community relies heavily on barter and local production. Farming, fishing, trapping, hunting, and foraging provide much of what residents need.
History
Bogsend was once a small and isolated agricultural settlement.
During the first year of the Blight, deserting soldiers and displaced survivors began arriving in greater numbers. Their experience changed the character of the settlement.
Palisades, watchtowers, patrols, stockpiles, and regular drills transformed Bogsend from a hidden village into a guarded survivalist enclave.
Present Day
Bogsend recognizes no formal noble ruler. Authority is informal and closely tied to veteran soldiers and other residents trusted with defense and supplies.
Independence here is not ceremonial. It is measured in stockpiles, patrols, fish traps, palisades, and the willingness to do without anything the settlement cannot make, gather, barter for, or smuggle in.
Smuggling provides access to silver, medicine, and other goods that local production cannot replace. Stories also accuse some Bogsend groups of taking supplies from outside caravans and outposts, while residents describe such acts as necessary for survival.
Outsiders are treated cautiously, and the settlement remains fiercely protective of its independence.
Notable Locations
The Freehold
The Freehold is the principal gathering place for communal decisions and defensive planning.
The Stockade
The Stockade serves as a protected reserve for important supplies.
The Sunken Crossroads
The Sunken Crossroads is associated with the informal trade routes that connect Bogsend to the wider marsh.
See Also
Weeping Fen
“The stone beneath Weeping Fen predates the settlement and was cut with a precision its founders did not possess. That the townspeople reused it is unremarkable. That so much of it was already there is not.”
— Veydrith Serrin, Lucent Endura
Weeping Fen is a fishing settlement in Fenmire built over and partly from much older ruins. Before the Rotmire Blight, rich fishing grounds and regional trade made it one of the marsh's fastest-growing communities. It is now silent, and no regular contact has returned from the settlement.
Overview
Weeping Fen grew around docks, fishing boats, netting racks, smokehouses, markets, and the preservation of fish for trade with Fenwatch, Mirefield, and other settlements.
For years the older stone sat beneath smokehouses, paths, foundations, and market life as part of the town's ordinary fabric. Only after fishing declined and contact ceased did those foundations become something people outside the settlement learned to fear.
As the town expanded, builders uncovered older stone beneath it. Pieces were reused in foundations, walls, paths, and smokehouses. Further excavation revealed smooth masonry, precise carvings, buried steps, and structures whose original purpose was no longer understood.
The ruins became part of ordinary town life long before they became a source of fear.
History
Weeping Fen initially avoided the worst effects of the Blight because of its remote location and limited road access. Refugees from other settlements arrived, and the town's fishing economy helped support the larger population.
Over time, the waters changed. Fish became less plentiful, and some catches showed pale flesh, darkened eyes, unusual growths, or other signs that residents associated with the Blight.
Fishing declined, and residents increasingly relied on hunting, foraging, scavenging, and trade with Mirefield.
Then the traffic stopped.
Present Day
The last known supply mission from Mirefield did not return. Later scouts also failed to come back, and no regular messenger or trading vessel has emerged from Weeping Fen.
The docks are reported silent and the smokehouses dark.
Among those watching the southern waters, stories increasingly repeat the name the Last God. Whether this describes a person, a cult, a title, or something else is not publicly known.
Notable Locations
The Great Smokehouse
The Great Smokehouse was the town's largest fish-curing facility and a major part of its trade economy.
The Tide Market
The Tide Market served fishers, traders, and visiting merchants while the settlement remained active.
The Ruined Steps
The Ruined Steps are part of the older stonework uncovered beneath the town. Their original destination and purpose remain uncertain.
The Drowned Altar
The Drowned Altar is another exposed part of the buried ruins and has become the subject of local superstition.
See Also
Thornmere Mines
“The deeper we go, the stranger the earth becomes.”
— Foreman Vren
Thornmere Mines are the principal silver workings of Fenmire and one of the most strategically important resource sites in Faulmoor. Their discovery transformed House Harrowden from a marginal marsh power into the controller of a resource made even more valuable by the Rotmire Blight.
Overview
The mines lie where the marsh gives way to ground firm enough to support shafts, carts, barracks, storehouses, forges, and defensive works. Reaching them still requires travel through difficult wetland and unreliable approaches.
A palisade, watchtowers, guards, and controlled access surround the principal workings. Security increased sharply after the Blight because silver became vital both as currency and as a material used against Blighted creatures.
Inside, damp shafts and tunnels descend through unstable rock. Flooding, collapses, gas pockets, and poor working conditions make mining dangerous even before the deeper rumors are considered.
History
The discovery of rich silver veins at Thornmere changed Fenmire's political position. Wealth from the mines strengthened House Harrowden, expanded Fenwatch, and made the region important to powers that had previously regarded the marsh as peripheral.
The Blight increased that importance dramatically. Security tightened, movement of silver became more closely controlled, and the mines became a source of both economic leverage and political resentment.
Present Day
Mining continues under heavy guard. Prisoners, debtors, laborers, and people with few alternatives are among those sent underground, and conditions are widely regarded as harsh.
Every ingot therefore carries two costs: the political value silver has acquired above ground and the bodies, debt, danger, and guarded labor required to pull it from below.
Rumors that the most accessible silver veins are failing circulate throughout Fenmire. Some miners claim crews are being pushed into deeper and more dangerous workings in search of new deposits. House Harrowden does not publicly confirm that Thornmere is nearing exhaustion.
Other stories concern tunnels or chambers that miners say were already present before modern excavation, along with old carvings, unexplained voices, and disappearances in the deeper workings. None of these stories establishes the original purpose of anything beneath Thornmere.
Notable Locations
The Deep Veins
The Deep Veins are the lower and more dangerous mine workings associated with the most persistent rumors of collapse, disappearance, and unfamiliar structures.
The Overseer's Post
The Overseer's Post is a fortified control point used to manage workers, security, and movement into the principal shafts.
The Chained Pit
The Chained Pit is a deep shaft whose lower extent is not publicly established.
See Also
The Blasted Hearth
“The damage in the lower halls does not resemble an ordinary fire. Stone has blackened in places and become glasslike in others, yet nearby surfaces remain untouched. Heat was involved. Beyond that, certainty would be premature.”
— Veydrith Serrin, Lucent Endura
The Blasted Hearth is a partially submerged complex of pale stone towers, broken archways, hollow halls, and deep passages on an isolated island in Fenmire. The site was formerly known in older records as the Pale Ruins, a name that survives only as a legacy title.
Overview
The island lies beyond difficult marsh water and shifting approaches, requiring deliberate navigation rather than ordinary travel. Mist, flooded ground, and heavy vegetation obscure much of the exterior.
Much of the unease surrounding the Blasted Hearth comes from contrast: flooded marsh outside, precise stonework within, and damage in the deeper complex that does not behave like the ruin of an ordinary building.
Tall cylindrical halls, massive stone corridors, underground passages, rusted conduits, columned chambers, faintly glowing inlays, and sealed doors have all been reported at the site. Some windowless chambers bear surfaces scorched or glasslike from intense heat or energy.
These features are observable, but their original purpose is not publicly known.
History
The site's age and isolation long made it a destination for pilgrims, mystics, relic-seekers, and explorers.
Before the Blight, worshipers associated with Mystra, the Weavekeeper were especially drawn to the ruins, believing divine presence or revelation could still be encountered there.
The island's difficult approaches limited ordinary settlement and looting. After the Blight, sanctioned travel became rarer still.
Present Day
The Blasted Hearth remains dangerous and only partially explored. Stories describe unnatural stillness, humming stone, strange lights, distant voices, sealed chambers, and relics hidden beneath water and masonry.
Some visitors regard the site as sacred. Others call it cursed. Those interpretations remain matters of belief rather than established explanation.
House Harrowden has shown little public interest in explaining the ruins, which has only encouraged speculation that more is known than has been admitted.
Notable Locations
The Upper Ruins
The visible complex includes pale stone towers, broken archways, overgrown foundations, and halls rising above the marsh water.
The Deep Passages
Underground tunnels and chambers extend beneath the island. Heavy doors, old conduits, columned spaces, and damaged surfaces suggest a complex far larger than the ruins visible above.